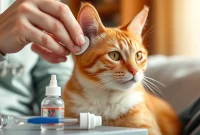
The Ultimate Masterclass on How to Trim Your Cat’s Nails at Home: A Stress-Free, Comprehensive Guide for Every Feline Parent
2 months ago
Ask a room full of cat owners about their single least favorite grooming chore, and a collective groan will undoubtedly ripple through the crowd. It isn’t scooping the litter box, nor is it vacuuming up endless tumbleweeds of structural undercoat fur. It is the highly anticipated, frequently delayed, and universally dreaded ritual of trimming their cat's nails.
For many, the mere thought of bringing a pair of sharp clippers anywhere near their cat's paws conjures up terrifying mental images of wild struggles, flying fur, accidental bleeding, and a deeply offended pet hiding under the sofa for three business days.
But it doesn't have to be this way.
In this comprehensive, long-form masterclass, we are going to demystify the art and science of feline nail maintenance. We will unpack why nail trimming is a critical cornerstone of your cat’s long-term physical health, map out the fascinating biomechanical structure of a cat’s paw, explore advanced behavioral desensitization techniques, and walk through a foolproof, step-by-step cutting process.
Whether you are handling a high-energy kitten, a territorial adult cat, or a sensitive senior feline, this guide is designed to transform a stressful standoff into a calm, routine, and positive bonding experience.
The Biological and Medical Necessity of Nail Trimming
To understand why keeping your cat's claws trimmed is so vital, we have to look past the superficial inconvenience of accidentally getting scratched during a playtime session or finding your expensive living room sofa slowly shredded into confetti. While protecting human skin and household furniture are wonderful side benefits, the primary justification for routine claw maintenance is strictly medical and biological.
The Mechanics of the Retractable Claw
Unlike dogs, whose nails are fixed in an extended position and naturally wear down through constant contact with rough outdoor surfaces like concrete, tarmac, and dirt, a cat’s claws are ingeniously retractable. They are nested safely within specialized skin sheaths between the digital pads, held back by elastic ligaments when the cat is at rest.
                      FELINE CLAW EXTENSION MECHANISM

  [ Rest State ]     ──► Elastic ligaments pull claw back inside skin sheath.

  [ Active State ]   ──► Digital flexor muscles contract, thrusting claw outward.
Because of this design, a domestic indoor cat’s nails almost never touch the floor during normal walking. They do not naturally wear down over time. Instead, a cat's nails grow continuously throughout their life in a distinct layered pattern, much like the layers of an onion.
The Myth of the Scratching Post
A common misconception among first-time cat owners is that providing a high-quality sisal scratching post completely eliminates the need for manual clipping. This is a profound misunderstanding of feline behavior and biology.
When a cat scratches an object, they are not actually filing their nails down. Instead, they are performing an ancestral behavioral ritual designed to sharpen them.
The physical act of scratching pulls off the old, dead outer layer of the claw (known as the corneal sheath), revealing a brand-new, razor-sharp, hook-like tip underneath. If you look closely around your cat’s favorite scratching spots, you will frequently find these hollow, crescent-shaped discarded husks littering the floor.
                     THE CRITICAL DIFFERENCE IN GOALS

  [ Scratching Post ] ──► Pulls off old outer sheaths ──► REVEALS SHARPER TIP

  [ Manual Trimming ] ──► Blunts the structural apex   ──► PREVENTS HOOKING
The Dangers of Overgrowth: Pain, Infection, and Structural Damage
If left entirely unmanaged in an indoor environment, a cat’s nails will eventually overgrow, leading to several painful conditions:
-
Ingrown Claws (Onychocryptosis): As the nail grows longer, it does not continue straight out; it curls sharply downward and backward in a widening spiral. Eventually, the razor-sharp tip will pierce the soft, sensitive digital pad on the underside of the toe. This creates a painful, open puncture wound that introduces bacteria every time the cat steps into the litter box, almost always leading to a severe infection.
-
Splitting and Traumatic Tearing: Long, hooked nails easily get snagged on carpets, blankets, knitted sweaters, or window screens. When a cat gets stuck, their natural instinct is to panic and pull back violently. This can completely rip the nail away from the bone, causing intense pain and heavy bleeding.
-
Skeletal Realignment and Arthritis: When a cat’s nails are excessively long, they can no longer fully retract them into their hidden resting positions. To avoid pressing the sharp tips into their own skin sheaths, the cat is forced to alter how their paws make contact with the floor. This shifts their entire body weight backward onto their hocks, disrupting natural alignment. Over several years, this unnatural posture puts severe stress on the wrists, elbows, and hips, accelerating the onset of painful arthritis.
Feline Paw Anatomy – Navigating the Safe Zone
Before you pick up a tool, you must understand the internal architecture of your cat’s claw. Cutting a cat’s nails without understanding their anatomy is like driving down a dark highway without headlights—it is only a matter of time before an accident occurs.
                     CROSS-SECTION OF A FELINE CLAW

                     ┌─────────────────────────┐
                     │     Corneal Sheath      │  ◄── [ SAFE ZONE ]
                     │  ┌───────────────────┐  │      (Clear, translucent)
                     │  │    The Quick      │  │  ◄── [ DANGER ZONE ]
                     │  │ (Blood/Nerve Core)│  │      (Pink, vascular pink)
                     └──┴─┴─────────────────┴──┘
The Two Core Components
A cat’s claw consists of two distinct, highly visible sections when viewed under good lighting:
-
The Corneal Sheath (The Safe Zone): This is the hard, outer protective shell of the claw. It is composed of dense keratin layers and is entirely translucent or clear in healthy cats. Because it contains absolutely no living tissue, blood vessels, or nerve endings, you can safely cut through this area without causing any pain or sensation to your cat, much like trimming human fingernails.
-
The Quick (The Danger Zone): This is the living, highly sensitive core nested deep within the base of the corneal sheath. The quick appears as a distinct pink or reddish triangular column running through the center of the nail. It houses a complex network of live blood vessels and hypersensitive nerve endings.
The Golden Rule of the Quick
If your trimmers nick or cut into the quick, two immediate consequences follow: the nail will bleed heavily, and the cat will experience a sharp, stinging pain. This single negative experience can instantly destroy months of trust and behavioral training, making future trimming sessions significantly harder.
Your absolute priority during every session is to stay well clear of the quick. It is always better to err on the side of caution—leaving the nail slightly longer rather than cutting too close to that sensitive pink boundary line.
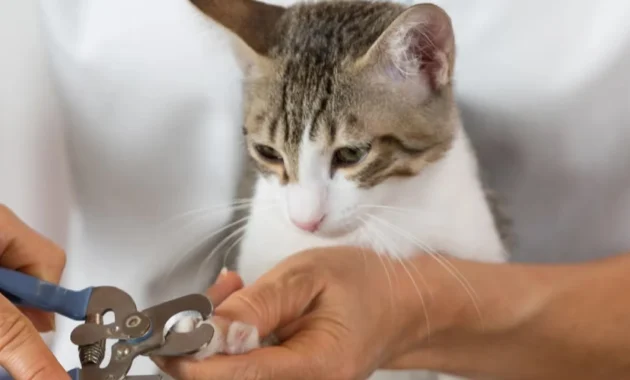
Professional Gear Guide – Selecting Your Arsenal
Many cat owners set themselves up for failure right from the start by using improper tools. If you try to use a pair of standard human fingernail clippers or low-quality scissors found in a desk drawer, you will likely hurt your pet and make the task unnecessarily difficult.
                         FELINE GROOMING TOOLKIT

  [ Scissor Clippers ]   ──► Best for kittens and small, delicate paws.
  [ Guillotine Style ]   ──► Best for thick, dense adult claws (High leverage).
  [ Styptic Powder/PK ]  ──► Mandatory safety backup for immediate clotting.
Why Human Clippers Are Inadequate
Human fingernail clippers are designed with flat or slightly curved blades meant to compress a flat human nail. A cat’s claw, however, is a rounded, three-dimensional cone.
When you apply a flat human clipper to a round cat claw, the blades crush and squeeze the nail from the sides before they actually cut through it. This crushing pressure splits, cracks, and shatters the keratin layers, which can cause discomfort even if you stay far away from the quick.
The Three Best Veterinary-Grade Tools
1. Scissor-Style Clippers
These look like miniature pairs of scissors, but feature small, semi-circular crescent cutouts notched into both blades. When you close the scissors, the two curved notches come together to form a perfect circle, wrapping completely around the round claw. This applies even, inward pressure from all sides simultaneously, resulting in a crisp, clean cut without any splitting or crushing.
-
Target Group: Absolute beginners, young kittens, and cats with delicate, fine paws.
2. Guillotine-Style Clippers
This tool features a static ring where you insert the cat’s claw, along with an internal blade that slices upward through the ring when you squeeze the handle. It offers exceptional mechanical leverage, allowing you to slice through incredibly dense, thick nails cleanly and effortlessly.
-
Target Group: Experienced owners and adults handling large breed cats (such as Maine Coons, British Shorthairs, or older senior cats with thick nails).
3. Stylized Cordless Nail Grinders
These devices use a rapidly spinning, textured diamond-bit emery wheel to gently sand down the tip of the nail. While they eliminate the risk of a sudden, sharp accidental cut, the continuous vibration and buzzing sound can be alarming to sensitive cats, requiring a longer behavioral conditioning process.
The Psychology of Desensitization – Training Your Cat to Love Paw Handling
The single biggest mistake most pet owners make is attempting to trim all twenty claws the very first day they bring their cat home. Forcefully pinning down a panicked animal will only trigger a defensive "fight-or-flight" survival response.
To ensure long-term success, you must use a slow, step-by-step process of behavioral desensitization combined with positive reinforcement. This process teaches your cat to associate paw manipulation with safety, comfort, and delicious rewards.
               THE 4-PHASE BEHAVIORAL DESENSITIZATION MATRIX

  [ Phase 1 ] ──► Daily Paw Massages (Zero clippers present)

  [ Phase 2 ] ──► Tool Introduction & Scent Mapping (Clippers near food bowl)

  [ Phase 3 ] ──► Sound Conditioning (Snapping raw spaghetti near ears)

  [ Phase 4 ] ──► The Single-Nail Milestone (One cut per day + High-value treats)
Phase 1: The Daily Paw Massage (Duration: 5–7 Days)
Begin at a moment when your cat is already completely relaxed, such as when they are sleeping in your lap or purring contentedly after a meal.
-
Gently slide your hand down to one of their front paws. Do not grab or hold it tightly; simply lay your fingers softly on top of the paw.
-
If the cat does not pull away, gently massage one of the individual toe beans using tiny circular motions for 3 to 5 seconds.
-
Gently press your thumb on the top of the toe while your index finger supports the digital pad underneath. This gentle pressure will cause the hidden claw to smoothly slide out from its sheath.
-
The moment the claw extends, release your pressure immediately and offer a high-value treat (like a lickable creamy treat or a piece of freeze-dried meat). Repeat this process daily across different toes until your cat actively welcomes paw massages.
Phase 2: Tool Introduction and Scent Familiarization (Duration: 2–3 Days)
Cats understand their world primarily through scent and observation. Place your chosen nail clippers flat on the floor right next to their food bowl or favorite sleeping perch. Allow them to approach the tool naturally, sniff it, and rub their cheeks against it to mark it with their reassuring facial pheromones. Never pick up the tool to threaten or tease the animal during this phase.
Phase 3: Sound Conditioning (Duration: 2 Days)
The sudden, sharp "click" or "snap" sound made by clippers cutting through a tough nail can be startling to a cat's sensitive ears. To normalize this sound:
-
Sit near your cat with a dry piece of raw spaghetti or thin wooden toothpicks.
-
Give your cat a gentle paw massage, and use the clippers to snap the piece of dry spaghetti just a few inches away from them.
-
Immediately follow the sound with an enthusiastic verbal reward and a treat. This trains their brain to realize that the sharp clicking sound always predicts the arrival of a reward.
Phase 4: The Single-Nail Milestone
You are now ready to make your very first cut. When your cat is resting peacefully, extend a single nail, ensure your position is well clear of the pink quick, and make a single, clean cut.
Once that single nail is trimmed, stop immediately. Do not attempt the second toe. Praise them enthusiastically, give them a premium treat, and let them walk away.
By keeping initial sessions incredibly short and stress-free, you prevent your cat from reaching a threshold of anxiety, setting up a foundation of trust for future sessions.
Step-by-Step Execution Guide – Trimming Like a Professional Vet Tech
Once your cat has successfully navigated the desensitization process, you can transition into full maintenance mode. Follow this structured blueprint to ensure every trim session runs smoothly and safely.
Step 1: Optimize the Environment
Never attempt to trim nails in a chaotic, noisy room filled with running children, barking dogs, or blasting televisions. Choose a quiet, enclosed room with a door you can close. Ensure the space is well-lit—natural sunlight from a large window or a bright desk lamp is essential so you can clearly see the boundary line of the pink quick inside the claw.
Step 2: The Ideal Handling Hold Positions
Depending on your cat’s unique personality, select one of the three proven handling methods:
The Lap Cradle (Best for Calm Cats)
Sit comfortably on a chair or the floor, and place your cat on your lap facing completely away from you. Their back should be resting gently against your stomach. This prevents them from backing away and gives you easy access to all four limbs extending forward.
                        THE LAP CRADLE SEATING ARCHITECTURE

                      [ Your Torso / Stomach Base ]
                                    │
                                    ▼
                      [ Cat Facing Directly Away ]
                         🐾 Kaki Depan Terbuka 🐾
The Tabletop Anchor (Best for Larger Cats)
Place a soft towel down on top of a waist-high table or counter. Stand directly behind the cat, leaning over them slightly with your forearm resting gently along their spine. This steady, supportive contact keeps them grounded without requiring you to pin them down aggressively.
The "Purrito" Towel Wrap (Best for Fractious or Highly Reactive Cats)
If your cat tends to swat or scratch with their free limbs during a session, use the classic veterinary towel wrap. Lay a thick, large towel flat on a surface and place your cat in the center. Wrap both sides of the towel securely over their back and neck, making sure it is snug but comfortable.
This gently keeps all four limbs safely inside the wrap. You can then smoothly slip out one single paw at a time to trim its nails, keeping the rest of the body safely contained and calm.
                        THE "PURRITO" SYSTEM ARCHITECTURE

                     ┌───────────────────────────────┐
                     │  [ Snug Towel Shell Wrap ]    │
                     │                               │
                     │   🐾 Only 1 Paw Exposed 🐾    │ ──► (Trims safely)
                     └───────────────────────────────┘
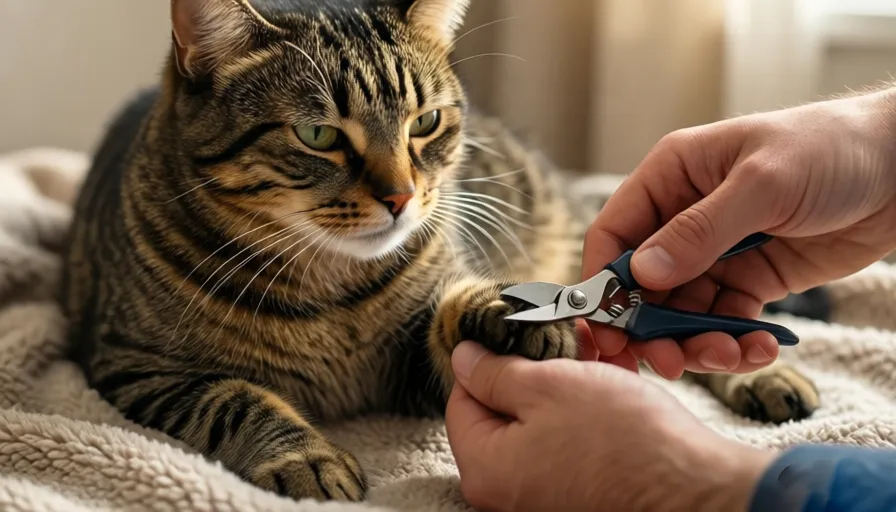
Step 3: Pushing and Extending the Claw
Pasp your cat's paw securely but gently between your thumb and fingers. Place your thumb on top of the toe joint right behind the base of the nail, and position your index finger underneath on the soft leather digital pad. Press inward and downward with a smooth, firm motion. This mechanical pressure forces the hidden claw to cleanly extend straight out from its skin pocket.
Step 4: Aligning the Cut
Examine the extended claw under your light source to locate the precise end of the pink quick. Position your clippers exactly 2 to 3 millimeters out from that pink boundary line, within the clear, translucent corneal sheath.
                     THE 45-DEGREE ERGONOMIC PROFILE

                        \  ◄── Clipper Blade Angle
                         \
                          \_______
                           \      \
                            \      \─── [ Claw Base ]
                             \______/
Align the cutting blades at a clean 45-degree angle, following the natural downward curve of the claw. This ergonomic angle mimics the natural wear pattern of a wild feline claw, ensuring your cat can walk comfortably without any awkward pressure points when the nail makes contact with the floor. Close the handles with a single, rapid, confident motion.
Step 5: The "Dew Claw" Inspection
After you finish the four primary front toes, move your thumb slightly higher up along the inside of the wrist to locate the dew claw (the fifth toe, which sits higher up on the inner side of the front legs).
Because this nail never touches the ground or encounters a scratching post during daily activities, it receives zero natural wear. If an owner forgets to check it, the dew claw can easily curl completely around into a tight circle, growing directly back into the soft leg muscle like an ingrown toenail. Make it a strict habit to inspect and trim this hidden claw during every session.
Emergency Management – Dealing with an Accidental Quick Cut
Even with perfect lighting and the best intentions, accidents can happen. A sudden knock at the door, a distant loud noise, or a sudden twitch from your cat can cause your clippers to slip, nicking the sensitive quick.
If this happens, the most important thing to remember is: do not panic. Cats are incredibly sensitive to human emotions; if you scream, cry, or drop the tool in a panic, your cat will mirror that fear, believing they have survived a life-threatening trauma. Treat it like a minor, routine inconvenience.
                 IMMEDIATE EMERGENCY BLEEDING PROTOCOL

  [ STEP 1 ] ──► Apply firm, continuous pressure with a clean cotton ball.
  [ STEP 2 ] ──► Pack the nail tip with Styptic Powder or Potassium Permanganate.
  [ STEP 3 ] ──► Maintain physical isolation for 10 minutes to protect the clot.
Step-by-Step Clotting Routine
-
Apply Immediate Pressure: Firmly press a clean cotton ball or gauze pad directly onto the bleeding nail tip for 60 seconds to slow the initial flow of blood.
-
Apply a Clotting Agent: Dip the wet tip of the nail directly into a jar of Styptic Powder (such as Kwik-Stop) or a pinch of veterinary Potassium Permanganate (PK) powder. If you don't have commercial medical powders on hand in an emergency, you can use common kitchen pantry thickeners like cornstarch or baking flour as an alternative.
-
Pack and Seal: Press the powder firmly into the tip of the claw using a cotton swab. The powder will quickly react with the blood to form an immediate, artificial blood clot, sealing the broken blood vessels.
-
Enforce Rest: Keep your cat calm and isolated on a clean bed or in their carrier for the next 10 to 15 minutes. Prevent them from running around, jumping onto high furniture, or digging vigorously inside the litter box, as these movements can crack open the fresh clot and restart the bleeding.
Special Guidelines for Diverse Life Stages
A cat's nail composition and behavioral tolerance change drastically as they transition through life. Your approach must adapt to match their current age and physical development.
1. The Kitten Stage (0 to 6 Months)
Kitten claws grow incredibly fast, but they are also exceptionally thin, soft, and needle-sharp. Because a kitten’s mind is highly flexible, this is the golden window to build a lifelong tolerance for grooming.
-
Frequency: Check and trim their nails every 1 to 2 weeks.
-
Strategy: Focus heavily on pairing the session with high-value treats. Keep your cuts minimal, removing just the very tip of the needle-like hook to teach them that paw handling is safe and routine.
2. The Active Adult Stage (1 to 10 Years)
Adult cats possess highly dense, strong keratin shells that require sharp, high-quality tools to cut through cleanly. They are also at their peak physical strength, meaning any behavioral issues can result in intense struggles.
-
Frequency: Check and trim every 3 to 4 weeks.
-
Strategy: Never turn nail trimming into a physical battle. If your adult cat actively resists after you finish cutting two paws, respect their boundary line, pause the session, and finish the remaining paws the next day.
3. The Golden Senior Stage (11+ Years)
As cats enter their senior years, their activity levels drop drastically, and they often spend much less time using their scratching posts. Furthermore, senior cats frequently develop a condition where their claws become excessively thick, brittle, and dry, losing the ability to shed their old outer layers naturally.
-
Frequency: Check and trim every 2 weeks.
-
Strategy: Senior cats often suffer from hidden joint pain or arthritis. Be incredibly careful never to pull their limbs outward or bend their legs into awkward positions. Keep their limbs tucked close to their body in a natural alignment, and consider using a gentle nail grinder to carefully smooth away thick, overgrown layers without putting pressure on painful joints.
Troubleshooting Guide – Overcoming Common Obstacles
Even after following the proper steps, you may still encounter unique behavioral or physical challenges. Here is how to navigate common troubleshooting scenarios:
What if my cat has black or darkly pigmented claws?
While most cats have clear, translucent nails, some mixed breeds or darkly colored cats possess dark brown or solid black claws. This dark pigmentation makes it impossible to see the pink quick from the side under normal lighting.
-
The Professional Fix: Look at the underside of the claw instead. Flip the paw over and look into the groove underneath the nail. You will see that the base of the nail is wide and hollow, but as it nears the tip, it narrows into a thin, solid ridge. Only cut the thin, solid tip portion. Alternatively, make tiny, incremental cuts just one millimeter at a time. As you get closer to the quick, the center of the dark nail will begin to show a soft, moist gray or black dot. The moment you see that central dot, stop cutting immediately, as it marks the beginning of the live tissue.
What if my cat begins to hiss, growl, or try to bite me?
If your cat shows any signs of aggression, they are communicating that they have reached their limit of fear and stress.
-
The Professional Fix: Stop the session immediately. Do not yell at, discipline, or punish your cat, as this will only reinforce their belief that nail trimming leads to danger. Calmly release them and give them space. Let them settle down for a few hours or a day before trying again, and consider breaking the process down into much smaller steps next time.
When should I surrender and see a veterinary professional?
If your cat becomes extremely aggressive, panics to the point of risking injury to themselves, or if you discover an overgrown nail that has already pierced deep into the digital pad:
-
The Professional Fix: Do not try to handle this at home. Take your cat to a local veterinary clinic or a professional pet groomer. These experts can handle the task quickly and safely using specialized equipment or mild, safe medical sedatitives, ensuring your cat's paws are cared for without causing severe behavioral trauma.
Holistic Support – Comprehensive Care Beyond the Clippers
Maintaining healthy claws goes beyond just cutting them; it involves supporting your cat's overall health from the inside out.
The Role of High-Quality Obligate Carnivore Nutrition
The physical structural integrity of a cat's skin, fur, and nails depends heavily on their daily diet. Because cats are strict obligate carnivores, they cannot efficiently process plant-based proteins or low-quality grain fillers. To build resilient, flexible keratin layers that resist splitting and cracking, their diet must be centered around premium, meat-based proteins.
                  THE NUTRITIONAL INTEGRITY MATRIX

  [ Real Animal Protein ] ──► High Amino Acids (Keratin architecture blocks)

  [ Omega-3 Fatty Acids ] ──► Deep Follicle Lipids (Supple skin & paw elasticity)
Ensure your cat food lists real named animal meats (such as whole chicken, deboned turkey, or fresh salmon) as the primary ingredients. Additionally, look for diets enriched with Omega-3 fatty acids (sourced from high-quality wild salmon or green-lipped mussel oils). These essential fatty acids nourish the delicate skin sheaths around the claw, prevent dry, cracked paw pads, and keep the nail beds healthy.
Environmental Enrichment: Setting Up the Perfect Scratching Array
To complement your routine manual trimming sessions, design an indoor environment that encourages healthy, natural scratching behaviors:
-
Provide Diverse Structural Materials: Every cat has individual preferences for textures. Offer a mix of vertical sisal rope posts, horizontal corrugated cardboard scratching pads, and natural, unpolished wood blocks.
-
Optimize Placement: Position scratching posts near high-traffic areas where your cat loves to spend time, such as right next to their primary sleeping windows or near the main entrance of your home. Cats often scratch right after waking up to stretch their spines and mark their territory, so placing a post near their favorite bed is an excellent way to encourage good habits and keep them away from your furniture.
Summary Checklist for a Successful Home Trim Session
Before you begin your next nail trimming session, review this quick reference checklist to ensure you have everything aligned for a smooth, stress-free experience:
Conclusion: Patience Transforms the Ritual
Mastering the art of trimming your cat’s nails at home is not a sprint; it is a patient, long-term journey of mutual trust. By choosing the right specialized tools, understanding paw anatomy, and committing to a gradual desensitization process, you can remove the fear and anxiety from this essential grooming chore.
Remember, there is no rule stating you must cut all twenty claws in one single session. If you can only trim one nail a day while keeping your cat calm and happy, you are succeeding.
Be patient, stay calm, and always keep sessions rewarding. Over time, your worry and hesitation will naturally disappear, and this once-dreaded task will evolve into a simple, routine part of your regular bonding time together. Your furniture, your skin, and above all, your happy, healthy cat will thank you for it.
FAQ
1. How often should I trim my cat's nails?
Most adult indoor cats need their nails trimmed every 3–4 weeks. Kittens may require trimming every 1–2 weeks due to faster nail growth, while senior cats often benefit from checks every 2 weeks.
2. Do indoor cats really need nail trimming?
Yes. Indoor cats rarely wear down their claws naturally because their nails stay retracted while walking. Without regular trimming, nails can become overgrown, snag on objects, or even grow into the paw pad.
3. Can scratching posts replace nail trimming?
No. Scratching posts help remove old nail sheaths and sharpen claws, but they do not shorten nail length. Regular trimming is still necessary for proper nail health.
4. What is the quick in a cat's nail?
The quick is the pink, living portion inside the nail that contains blood vessels and nerves. Cutting into the quick can cause pain and bleeding, so only trim the clear tip of the claw.
5. What should I do if I accidentally cut the quick?
Stay calm and apply gentle pressure with gauze or a cotton ball. Use styptic powder, cornstarch, or flour to help stop the bleeding. Most minor quick cuts stop bleeding within a few minutes.
6. What type of nail clippers are best for cats?
Scissor-style cat nail clippers are usually the easiest for beginners. Guillotine-style clippers work well for thicker nails, while nail grinders can be useful for cats that tolerate vibration and noise.
7. Can I use human nail clippers on my cat?
It is not recommended. Human nail clippers can crush and split the curved structure of a cat's claw. Specialized cat nail clippers provide a cleaner and safer cut.
8. How can I keep my cat calm during nail trimming?
Start with gentle paw handling and reward your cat with treats. Keep sessions short, choose a quiet environment, and use positive reinforcement to create a stress-free experience.
9. Why does my cat hate having its paws touched?
Many cats are naturally protective of their paws. Gradual desensitization through daily paw massages and rewards can help your cat become more comfortable with handling over time.
10. Should I trim all of my cat's nails at once?
Not necessarily. If your cat becomes stressed, it's perfectly fine to trim only a few nails per session and finish the rest later.
11. What are dew claws and do they need trimming?
Dew claws are the extra claws located on the inner side of the front legs. Because they don't contact surfaces naturally, they often grow faster and require regular trimming.
12. How do I trim black cat nails when I can't see the quick?
Trim only small amounts at a time. Watch for a dark or moist-looking center inside the nail, which indicates you're approaching the quick. When in doubt, leave the nail slightly longer.
13. Can overgrown cat nails cause health problems?
Yes. Overgrown nails can curl into the paw pad, cause painful infections, affect walking posture, and contribute to joint stress over time.
14. Is nail trimming different for kittens and senior cats?
Yes. Kittens have softer, sharper nails and benefit from early training. Senior cats often have thicker nails and may require more frequent maintenance due to reduced scratching activity.
15. When should I take my cat to a veterinarian or professional groomer?
Seek professional help if your cat becomes highly aggressive during trimming, if a nail has grown into the paw pad, or if you're uncomfortable performing the procedure yourself.